|
Saab 9000 Kliimaseadmete areng
Algallikas: http://www.tomorrowstechnician.com/tt/t230332.htm
mis omakorda baseerub Boe Kalinoski’s artilile ImportCar magazine
When the Saab 9000 was introduced in 1986, it represented an evolutionary
time for the carmaker. It was a drastic change for Saab to produce a model
that had several electronic devices, including a sophisticated climate
control system. The strangest thing about the system was that it couldn’t
be shut off at all. It would run constantly, blowing cold air in your
face when it was set at the wrong temperature (either extremely high or
extremely low).
A Smarter Saab
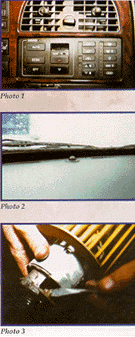
In 1990, Saab came out with the much "smarter" ACC2 system
(See Photo 1). The new system is equipped with improved sensors and a
shut-off switch, and a more accurate flap control to provide improved
standards of comfort and quieter operation.
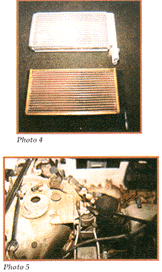
An interesting innovation exclusive to Saab is the solar sensor (world
patent pending) that is fitted on top of the dashboard (See Photo 2).
In addition to measuring the infrared radiation to calculate sun intensity,
the new sensor also detects the angle of elevation and bearing of the
sun.
The program memory in the ACC2’s microprocessor has been expanded to
provide more accurate and faster control of the passenger compartment
climate. There are also expanded self-test capabilities for easier fault
finding using the Saab test scanner called TECH II. This scanner is loaded
with the necessary software from Saab and is used for all other systems
in its vehicles.
In 1995-’98 models, Saab upgraded its climate control system to what
was called the ACC3. It was used throughout the rest of the 9000 model
production. The microprocessor was recalibrated and the addition of a
blend-air temperature sensor made the unit truly unique.
The automatic control panel/unit receives information from four sensors
and pushbutton settings. When the vehicle is started, the system switches
on automatically, and the temperature is adjusted up or down to the selected
temperature.
It is possible to override the automatic program by pressing one or more
buttons on the control panel. The system will then lock in on a selected
mode, but the remaining modes will continue to be automatically controlled.
The auto indicator light will go out as soon as the ECON mode or OFF position
has been selected.
In cold-weather starting, the program will automatically activate rear-window
and door-window heating, defroster settings, and maximum heat and low
fan speeds. Once the supply air is warm enough, air will be distributed
through the floor vents and fan speed will be increased. As in-car temperature
approaches the selected temperature, the fan speed and heat supplied will
automatically be gradually reduced to a suitable level.
In warm-weather starting, automatic programming initially directs fresh
air through panel vents at high fan speed and then switches on the A/C
compressor (unless ECON mode has been selected). Air recalculation will
be selected after about one minute if ambient air temperature is greater
than 77°F. If ambient air temperature is less than 77°F, the system selects
the floor/panel or panel settings. As in-car temperature approaches the
selected temperature, fan speed will be automatically reduced to a suitable
level.
Down to the Core
The heater core is located at the bottom of A/C heater assembly. Since
no heater control valve is used in this system, the heater core is always
warm. A heater core sensor is used to sense the temperature of the air
leaving the heater core.
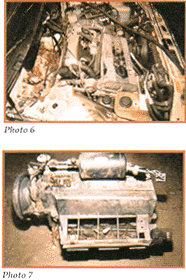
When a customer has a complaint of low coolant level and/or a faint odor,
suspect the heater core for a seepage problem. We recommend replacing
the blower motor at the same time (if it exhibits signs of failure or
wear, or has clocked more than 100,000 miles), since it is located in
the same area as the heater core and they both undergo similar replacement
procedures. The blower motor’s brushes and commutator are prone to wear
as they are operating most of the time (See Photo 3).
Unit Removal
1.) First, disconnect the negative battery cable and remove the wiper
arms.
2.) Mark/scribe the hood hinges and remove the hood.
3.) Remove the covers from the windshield wiper motor and evaporator.
Unplug the connector for the blower motor control unit.
4.) Remove the seal from the false bulkhead panel and lift out signal
converter.
5.) Remove the bolts and place the electronic ignition control unit aside.
6.) Remove the four screws leading through the panel from the false bulkhead.
7.) Cut the wire harness tie straps and unplug the connectors. Remove
the complete wiper assembly.
8.) Drain the cooling system and remove the rubber grommets for the cooling
hoses. Disconnect the quick-release couplings for the coolant hoses at
the heater core.
9.) Remove screws and push aside the vacuum pump for the cruise control
system.
10.) Hook up the A/C recovery unit to the compressor and vacuum out all
of the refrigerant.
11.) Remove all evaporator screws and clips for the refrigerant hoses.
12.) Remove the lock washer and disconnect the cable from the temperature
valve.
13.) Remove the engine bracket from the right rear corner of the engine
compartment. Push the engine toward the front and reinstall the bolt to
provide clearance for removal of the evaporator (See Photo 4).
14.) Carefully lift the evaporator and remove the complete blower motor
assembly in a diagonally upward motion. When the blower motor and housing
are removed, the heater core is visible and in the open. Just slide out
the old core. Wrap foam rubber strip around the outside of the core for
vibration isolation. Then install the new unit.
15.) Clean out the leaves and debris from the bulkhead area and inspect
the water drains. It is also a good time to replace the fresh air filter
(See Photos 6 & 7).
16.) Now inspect the blower motor. To do this, it is necessary to remove
the motor from the blower housing.
17.) Replace the motor if signs of binding, brush/commutator wear or
bearing noise are obvious. This extra step will prevent time-consuming
comebacks.
Saab Safety Recall
Saab had a safety recall a few years ago for the SRS system on 1992-’94
9000 models (Manufacturer campaign #708). It was failing because hot coolant
that was leaking from the heater core ended up dripping on top of the
SRS control unit, causing it to short out. A small plastic tray was placed
on top of the unit to protect it until the core was replaced.
The heater core was a plastic/aluminum unit that had leakage problems
at the point where the seams met. Saab recently came out with a revised,
replacement unit that is all-aluminum and requires no modifications.
| 